Tuesday, March 29, 2011

Quandary

In my last post I showed you a few photos of our living room, including this one of a pair of wooden chairs that sit across from my new sofa. They were looking pretty shabby when I purchased them so I had every intention of painting them. But after scrubbing them real good and plopping them down, I actually like the look of the plain wood. Then again, almost every piece of furniture in the room is dark wood. The sofa, desk and chair, piano, shelves, top of coffee table, buffet, dining table and chairs- even the laminate floors are dark! So the way they are now, they're just lost among all that dark wood. So as much as I like the wood look of these chairs, I'm still leaning towards painting them. In fact, tonight I went to Home Depot and had some paint mixed up. It's called Moonlit Pool by Behr and I think it would look fabulous on those babies. Something of a risk, I know, but that's what I want. This room needs some color! I think they'd also look stunning in a dove or charcoal gray, Heirloom White (like the base of my coffee table, as per Lora's suggestion), or even black (though I don't have a stitch of black furniture in my whole house). I would bring this color in elsewhere, too, like in sofa pillows and artwork, so the chairs wouldn't be the only dark teal items in the room. And what about that side table?? I somehow managed to overlook the fact that the chairs sit right next to another painted piece of furniture- one that is already a shade of blue that might not get along real well with this new Moonlit Pool character. So I need some help. What should I do about those chairs?


  • A) Take a risk, give the room a punch of color and paint them in that lovely shade of teal, and replace the side table (not a bad thing- you know how much I love changing out furniture).

  • B) Take less of a risk and paint them gray so that they're not quite so bold but still painted; keep or replace the side table.

  • C)Paint them a safe, subdued, neutral color (like ivory) that will allow them to completely blend in with the room (and possibly the background...); keep the side table.

  • D) Don't paint them at all and embrace their warm, dark-woodedness; keep the side table.

  • E) Some other brilliant idea that one of you comes up with!


Help me, please! Leave your vote in the comments, I'm begging you!

Saturday, March 26, 2011

Before and After: Antique Sofa

When we were preparing to move from Idaho to California we sold some of our furniture. One of the things we got rid of was a sofa that we had upstairs in our bonus room because we weren't sure if we'd even need it in our next house. Turns out we did, so I started looking around. I really wanted a sofa bed, like this one from Ikea, because we don't have a proper guest room here.

I searched several local stores but couldn't find anything even close. And eventually I got over the whole sofa bed idea and just started looking for a regular sofa like the one above and still came up empty. Then I got over the whole "spend a bunch of money on a brand spankin' new sofa" idea and finally remembered seeing a cool old couch at the Salvation Army.
At the time it was priced at $100, then 2 weeks later when I was on my sofa hunt I went back and it was still there and had been marked down to $49. I texted my husband a photo and told him I could re-cover, it so we picked it up and brought it home.

The velvet was horribly faded, and the wood needed some touching up, but I loved the details like the scrolled arms and the clawed feet.


This shows just how faded the fabric on the back of the couch had gotten. The blue at the bottom of the photo is the wrong side of the fabric and the dingy cream color is the right side. It was pretty once, but not anymore.

I ripped the velvet off and got ready to work on the wood. This is a product I've never used before but have been wanting to try.
The Antique Walnut shade seemed pretty close to the current wood color, so on it went and it worked WONDERS. Seriously, if you have a wooden piece that needs a facelift, use this. You don't need to strip off the old finish or anything. Just brush this on like paint, let it dry 6 hours, rub the surface with very fine steel wool, brush on another coat and that's it!

Here's the fruits of my week's worth of labor.

Hardware store drop cloth was my fabric of choice because it's durable, inexpensive, imperfect and casual so it brings down the "fussiness" of the couch.


This was a pretty big project, but after redoing my brother's couch last summer I knew I could handle it. It would have been infinitely faster and easier if I had a good staple gun, but don't get me started on that. I hate my staple gun with all my heart right now, and I'll just leave it at that.
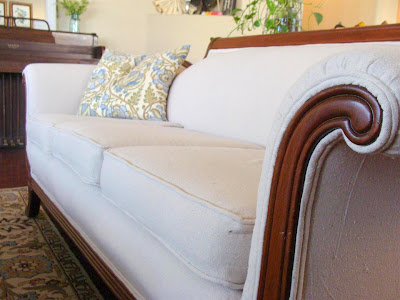
I'm really happy with our new couch, and it seems like a good fit for our front room. Here's a little tour. This is the view from our front door into the living/dining room.


We have our computer in there, too, so it also serves as an office.

We recently acquired this piano from a friend and I'm really excited to find a bench for it and get it cleaned up for playing.

This is the view from behind the sofa. Should I paint that pair of armchairs? I can't decide.

So there you go. I love when I get to do big, dramatic projects, but I think that will probably be it for a while. There will definitely be more furniture refinishing going on, but probably no more sofas for a while!

Thursday, March 24, 2011

Miss Mustard Seed feature

I'm so freakin' excited, I'm practically giddy! Minutes ago I plopped down in front of my computer, exhausted but pleased with myself for finishing another HUGE furniture project that has taken me all week. Seriously, I've been working my hiney off and I had just put the finishing touches on it.

I opened up my Google Reader to scope out the blogs that I follow and my number one favoritest blogger, Miss Mustard Seed, had posted her Furniture Feature Friday party.
At the beginning of each party she features a couple of projects that people had linked at the previous week's party that had caught her eye. Well, I'm usually just an admirer and don't often join the party, but last week I did link up with my desk-turned-island project because, I'll be honest, I was totally stoked with how it had come together and was super proud of it.

Long story, short ending-- she featured my island!!! I squealed and clapped and ran to show my husband who indulged my silly excitement with a hug and a chuckle. He just doesn't get it. He doesn't know who Miss Mustard Seed is, but I sure do and I was tickled to death to see my project on her blog.

Okay, enough gushing. Moving on- my island stools arrived this morning! Thanks everyone for your sweet comments about my island project, by the way. I appreciated each and every single one. I wanted to give Abby an extra thank you for her comment. She gave me a link to a set of stools on Overstock.com that she thought I might like, which I purchased immediately.


They were exactly what I wanted and a really good price. Only bummer is I think they're even cheaper now than when I bought them last week. :/ But I LOVE them and am super glad that we can now eat at the new island. Still mulling over the drawer handle dilemma, but I'm in no hurry.

Earlier I alluded to my latest project, and I can hardly wait to show it to you. I gave you a sneak peek with this mysterious photo.
Any guesses? Could it be a chair? You know I have a thing for chairs. A sofa? Maybe a bench or chaise? Or maybe it's something you'd never EVER guess and I'm just trying to throw you off track. Just wait a little longer and I'll show ya. The weather doesn't look like it's going to cooperate any time soon for me to get some good photos, but we'll see what I can come up with. See ya soon!

Wednesday, March 16, 2011

Antique Writing Desk Transformation: The Reveal!

I've talked up this project quite a bit in my last few posts, but I hope that you'll agree when I say that this "before and after" is a pretty cool one. This old writing desk cost me $15 and was pretty neat as it was. Just look at that beat up plank top!

But I had a vision for this piece, and over the past couple of weeks I've worked hard to make that vision a reality. Ready to see?

Here's that old desk now. No longer a desk, but a kitchen island!


The color isn't exactly what I was going for, but after 3 coats of 3 different paint colors I decided it was time to just settle. The heavy distressing and brown glaze help tone down the paint color and bring out the piece's character.

I found this heavy appliance handle at the local Habitat for Humanity Restore. It was tricky getting it on there, having to drill from the inside of the desk then cutting down the screws to be the exact right length... but it worked out in the end.

I added a piece of plywood underneath for some more storage. The baskets came from Michael's during their 50% off all baskets sale a few weeks ago. I think I might need to pick up another one.


Not much going on in back, but I'm still thinking of what I could add to make it more functional somehow. Hooks? Another towel rod? Chalkboard paint and little buckets of chalk?

Love that distressed look
Another little addition to the desk/island were these casters. It once had wheels so the metal inserts were already in the bottom of each leg. These helped me to add some height and also make it easy to reposition. The cups underneath keep it in place when I want it stationary.

Okay, here's where I have to come clean. My new island isn't completely finished yet. For instance, these two skinny drawers drive me nuts. They're so hard to pull out with no handles, so I'm considering doing something...

...like this! What do you think? Maybe a fork on one and a spoon on the other?

I just hate to cover up those cool key holes. I'll have to think about it some more.
This overhang also needs a support underneath so we can use it for eating at.
I'm on the hunt for a couple of stools. Here are some that I adore:


Probably not going to luck out and find anything like the stools above at a thrift store or Craigslist, but a girl can dream. Instead I'll probably try and build a couple of simple wooden ones like this (only taller):

So that's it! Writing desk turned kitchen island. I have to say, I'm pretty pleased with how this turned out. I wasn't entirely sure I was going to be able to pull it off, but I think it's a keeper.


I'm linking this project to Miss Mustard Seed's party this week!

Tuesday, March 15, 2011

Upcoming reveals

Remember that crazy old writing desk I bought on Craigslist last month?

I am soooo close to being finished with its transformation and I just can't WAIT to show you the result. Here's a little sneaky peek...

Hope I didn't give too much away. I've put a lot of hard work into that thing and it's coming together exactly like I'd hoped. Seriously, this has been one of my MOST EXCITING projects for a long time!

I have yet another exciting project waiting in the wings that I'm itching to tear into...

... and a few more pieces that are in progress that I'll be able to reveal soon.
Are you excited? Are you pumped? Are you just about dying from anticipation?!!

No? That's okay. But I do hope you're curious enough to come back and see the official "before and afters" that I'll be posting soon!